
Deploying Cloud Foundry
Note: This post is outdated: while the concepts are still the same, deploying CF has become much more easy over the last years, so don’t use this text to do an actual deployment unless you want to deploy like it’s 2015.
Let me start by stating Cloud Foundry (CF) is an amazing platform once it’s fully installed and operational. However, installing it for the first time on your own infrastructure can be quite overwhelming since:
- CF is installed with BOSH which is an awesome tech, but with has a high inception level learning curve (more later)
- the documentation on deployment manifest generation out there is mostly outdated, sometimes wrong and never complete (pieces everywhere)
- there is hardly any available documentation on error scenarios (what to do when you see Error “XYZ”)
It’s most convenient to go for a commercial version of Cloud Foundry, for instance the Pivotal CF offering, which ‘just works’ comes with support and is more noob friendly (it has GUIs). In the enterprise world there is a real business case to be made here - compare it to RedHat Linux with support over any vanilla Linux - but small/mid businesses this case is harder to make.
So below you’ll find a comprehensive overview of the deployment process, followed by the actual steps to get vanilla open source CF going. The infrastructure used here is VMware vSphere, but the steps are largely infrastructure agnostic.
Prerequisites
Hosts
Minimum/recommend hardware requirements are updated constantly, and depend on usage. I installed it on an ESXi 6.0 host (managed by vCenter Server) with the following specs:
- 64GB RAM
- 700GB storage
- Xeon E5-2620 v2 (6 core/12 threads)
- 2 network cards
Especially on the storage side this was pushing it (had to redeploy a few times before success), so I’d advice going for 96GB RAM + > 1TB storage. The CPU was quite sufficient for deploying and running Cloud Foundry itself, but may need to scale depending on the workloads you intend to land on the platform.
Infrastructure
- For connectivity we need two free /24 network subnets (public and private) with a gateway to the rest of the world.
- We need a DNS wildcard record to the CF subdomain. For instance if your internal domain is ’lab.local’, add a ‘*.cf.lab.local’ record pointing to somewhere in the public subnet. This ‘somewhere’ is the IP of the loadbalancer. In production environments, this could be a physical machine, but by default the CF deployment will come with a HAProxy machine.
- As vCenter is used to manage the IaaS in this case, we’ll need a user with certain privileges (for my test setup I just used the vCenter admin).
Why can’t I just install an OVF?
A Cloud Foundry installation consists of ~24-40 VMs. And we don’t just want to install them, we also want to monitor them, automatically recover from failure, update with zero downtime, and provision software on them. Early versions of Cloud Foundry used Chef to do this, but this wasn’t ideal and a new technology was developed. Meet BOSH:
‘‘BOSH is an open source tool for release engineering, deployment, lifecycle management, and monitoring of distributed systems."
So I just create a VM and install BOSH in it?
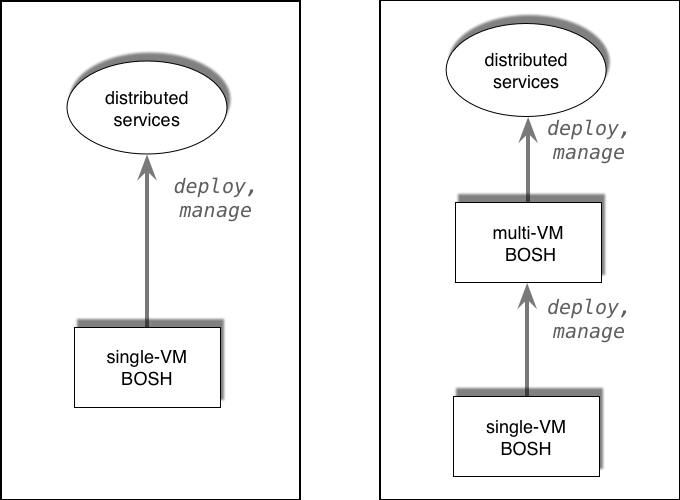
No. That would be too easy. Creating a ‘jumphost’ Linux VM is only Inception level 1. The whole process looks like this:
- level 1 - deploy a jumphost
- level 2 - deploy single VM BOSH ‘Director’ using the jumphost and bosh-init
- level 3 - optional: deploy multi VM BOSH ‘Operations Manager’ using the jumphost and bosh CLI to target the Director
- level 4 - deploy Cloud Foundry
 Inception
Pivotal CF in fact combines the first 2 steps into one ‘deploy OVF template’ and abstracts the BOSH actions behind a pretty UI, but for vanilla CF we have to do everything manually.
Before we submerge into the dream, let’s avoid confusion about BOSH naming and architecture:
- Sometimes you see references to microBOSH. Ignore this: microBOSH was an older - now deprecated - way to get a Director VM running
- BOSH lite is a version of BOSH intended for testing purposes: it doesn’t require an IaaS as it emulates VM creation by spinning up containers. Very convenient, very not production ready.
- BOSH is a generic tool. It was developed for Cloud Foundry, but it’s completely decoupled, and other software also uses it (e.g.: Concourse CI).
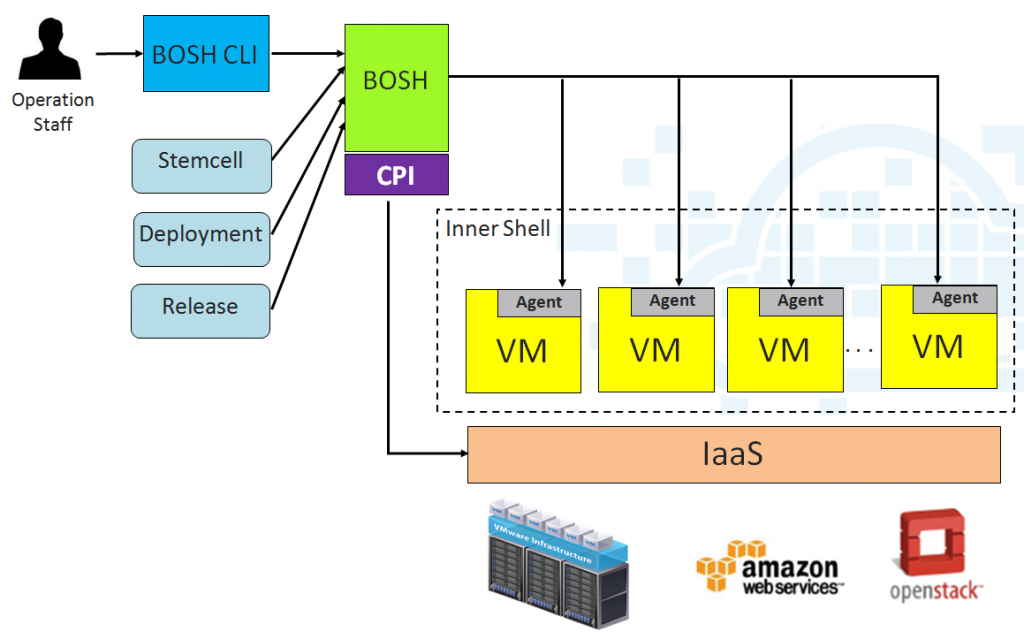
- BOSH is infrastructure agnostic. It uses a Cloud Platform Interface (CPI) ‘plugin’ to translate the infrastructure agnostic deployment manifest into Infrastructure specific commands. To provision software and monitor the running jobs, stemcells come with a BOSH agent running inside the VMs.
 BOSH architecture
BOSH works with the concepts of:
- Stemcell – a VM template for the specific IaaS consisting of Linux with the BOSH agent
- Release – a collection of all software bits used in the distributed system we want to deploy
- Job – one component (running VM) in the distributed system
- Deployment Manifest – a manifest describing the distributed system as a number of jobs
- Deployment – the entity that transforms the above into a collection of running VM.
So with all of that out of the way, let’s get to it.
The installation
I’ll assume you have all the prerequisites in order, and have a ‘jumphost’ Linux VM which can reach the public subnet in which we’ll deploy Cloud Foundry. We’ll be going for the full package with a Director and Operations Manager.
Before we start, collect the information about your vSphere and vCenter that you need to configure the environment. This includes:
- The names for your datacenter, datastore, cluster, resource pool, and network.
- The IP addresses for your vCenter, network gateway and DNS.
- The static IP addresses for the VMs to be deployed.
- The range of IP addresses of your network.
- The range of IP addresses that you want to reserve. These, and the static IPs, are off-limits to BOSH when BOSH needs to dynamically use an IP address for tasks like compilation.
Deploying the Director
Deploying the Director VM using bosh-init from the jumphost is pretty well described here. The result should be a deployed Director VM, reachable from the jumphost. If you didn’t do so already, set the target of the bosh CLI tool to point to the Director VM with:
bosh target <directorVM_IP>
Deploying the Operations Manager
Next we are going to deploy the Operations Manager (Multi VM BOSH). To do this:
-
download the latest stemcell for your IaaS and upload it to the Director:
bosh upload stemcell bosh-stemcell-3177-vsphere-esxi-ubuntu-trusty-go_agent.tgz -
download the latest BOSH release and upload it to the Director:
bosh upload release bosh-3177.tgz -
create a deployment manifest ‘bigbosh-deployment.yml’ by customizing an example. See the manifest schema for reference. You’ll have to change:
- the director uuid - you can get this from the director with
bosh status --uuid - the bosh release version - you can see the version with
bosh releases - the networks element according to your setup. Note that for the vSphere IaaS, the network name is the virtual switch name. Don’t forget to include the Director’s own IP in the reserved range, and make sure there are some IPs available in the subnet outside the static/reserved range for dynamic IPs BOSH may need for compilation or canary deployment.
- the stemcell name and version where it is mentioned
- the static ips of the bosh_api and bosh_data respectively to what you want them to be. Remember to change the IPs found under properties accordingly
- any passwords you want to be non-default
- the ‘vcenter’ vSphere CPI block
- the director uuid - you can get this from the director with
-
set the deployment for the Director to the manifest:
bosh deployment bigbosh-deployment.yml -
deploy:
bosh deploy -
verify the deployment:
bosh vmsBoth jobs/vms should be running.
Deploying Cloud Foundry
Finally! We’re getting to deploy Cloud Foundry! Let’s start by targeting the Operations Manager:
bosh target <OpsManager_IP>
where OpsManager_IP is the IP of the bosh_api you specified in the manifest above.
In principle, the steps we have to follow now are identical to the steps in deploying the Operations Manager: upload stemcell, upload release, create manifest, deploy. However, the steps themselves are a bit more involved.
Stemcell
The stemcell part is identical to the previous deployment: just upload the stemcell you downloaded before to the Director
bosh upload stemcell bosh-stemcell-3177-vsphere-esxi-ubuntu-trusty-go_agent.tgz
Release
For the release we have to do some work: while bosh itself has a prepackaged release binary, we have to get the one for Cloud Foundry from source, create a release and upload that to the Director:
- Get the source:
git clone https://github.com/cloudfoundry/cf-release.git
- Get all submodules:
cd cf-release
./scripts/update
- Create and upload release:
bosh create release
bosh upload release
While this seems like more work - which it is - there is actually a benefit as updating Cloud Foundry becomes a breeze in the future: just git pull the latest sources and go through the previous steps and your CF is updated.
Manifest
The deployment manifest requires a bit more work than just copy-pasting a manifest from somewhere. As stated above, a full Cloud Foundry installation can be 25-40 machines and it would be a nuisance to edit or create a manifest from scratch that describes all those jobs. Instead, most of the work is already done for you: the cf source comes with a collection of manifest snippets that are tailored to the infrastructure you need. All you have to do is customize an also provided manifest ‘stub’ that contains all the deployment specific details, and combine it with the provided manifests:
- Install the declarative BOSH deployment manifest builder spiff
- Copy the supplied stub for your infrastructure to your working folder:
cp ~/cf-release/spec/fixtures/vsphere/cf-stub.yml
-
Customize the stub as you did for BOSH itself before. At the very least you’ll need to:
- Supply an environment name
- Supply the correct Operations manager Id, from:
bosh status --uuid - Configure the 2 networks. Remember to add any ips already active in this range to the reserved pool, provide a range of at least 26 static ips, and leave some ~20 ips in the range for dynamic assignment (for temporary BOSH worker machines).
- Configure any user credentials you want to be non-default.
- Specify domains (root, apps, and system) and organisation name.
- Supply RSA keys for the haproxy and jwt (signing = private, verification = public). Generate pem format keys with:
ssh-keygen -t rsa -b 4096 -f uaa
openssl rsa -in uaa -pubout > uaa.pub
- Use spiff to transform the stub into a full deployment template:
./cf-release/scripts/generate_deployment_manifest vsphere cf-stub.yml > cf-deployment.yml
Deploy
The final step is the actual deployment. In a happy world you:
- Tell BOSH to use this manifest for deployment:
bosh deployment cf-deployment.yml - Deploy!
bosh deploy - Test the deployment by listing the vms
bosh vms - If all vms are there, try to hit the api endpoint with
curl api.cf.lab.local
But…a lot can go wrong:
- cannot create VM because IP address already in use - you have a misconfiguration in your networks section. Most likely is an overlap between the 2 networks. Note this can be implicit: if the 2 subnets overlap you have to make explicit reservations in the first range for implicit dynamic ips in the second range and vice versa.
- 503 on hitting the API endpoint - this is a routing issue. Check if your DNS for the api resolves to the haproxy IP. If necessary, edit the stub to let haproxy sit on a static IP.
- can’t start a job/VM - can happen in resource constrained systems, or systems with multiple datastores. Try to redeploy.
- websockets handshake error on loggregator while pushing an app - check if the logs specify the correct domain for loggregator. Can happen if ‘domain’ and ‘system_domain’ in properties aren’t identical.
- no valid stager found while pushing test app - check if the DEA has ample diskspace/memory (100G/10G), sometimes in the default manifest this is too restricted
If you make a change to the stub, make sure to regenerate the deployment manifest and redeploy.